How to Adjust Rollers on Andersen Sliding Glass Doors?
It’s just holding the door up and fixing some screws- that’s how you adjust the rollers. Yes, it’s easy to say, we know. But when you get your hands on the Andersen sliding glass doors, you get perplexed. But not anymore! Today, we will tell you how to adjust rollers on Andersen sliding glass doors-both for the Andersen rollers and the non-Andersen ones!
How to Adjust Sliding Door Rollers on Andersen Sliding Glass Door
We have listed a few steps that will help you install the Andersen sliding glass door easily. In this way, you can take off the previous rollers and adjust the new ones too!
Step 1: Remove the Stop
First of all, you need to unscrew the inside stop and then remove it. When the stop is removed, the door panel will tilt into some room. Get a partner so that he can hold the door up. In this way, you can take off the previous rollers and adjust the new ones. At times, the rollers are displaced. You might ask- why is my sliding door so hard to open!
The only thing wrong is the misplaced rollers. In case your rollers get displaced, you can just tell your partner to hold the door up and simply place them in their right place. Here, unscrew the stop when he is holding the door up.
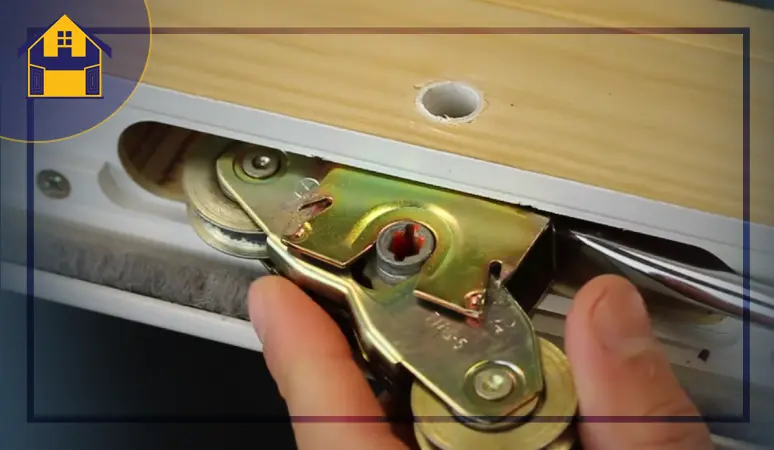
Step 2: Remove the Roller and the Bracket
So now, the door is lying tilted or flat. As a result, the bottom end of the door will point at an upward angle here. To do your job in this position, you must get your hands on two screwdrivers. With the two gears, you need to grip the underside of the rollers.
Keep in mind that the Andersen rollers you are using are not usually screwed or nailed into the glass door. So, there is a chance of popping out easily. You can simply do this job with your screwdrivers. In short, with the help of this method, you can bring out the roller and the bracket together! However, at times, the rollers will come out separately.
And the bracket will stay there. If you see that the bracket remains in, you can take them out with the screwdrivers. All you need is to re-insert the screwdrivers and then with these, pull the bracket out. And you are done!
Method 1: Adjusting Andersen Rollers on Andersen Sliding Glass Door
The very first reason why the rollers require adjusting is they get misplaced. Well, in that case, you can always settle for the best barn door floor guide to keep the door in place. When it comes to adjusting the rollers on your Anderson sliding glass door, your first job is to take off the plastic plug.
Take a look at the face of the door panel. There will be a plastic plug added. All you need is to remove it. However, removing it might not be too easy. In some cases, it won’t lift easily. If this happens, you can use a flat screwdriver for this job.
With the screwdriver, you have to pry the plastic plug up. Make sure you are gentle when you use the screwdrivers. Here, finding the hole is also necessary. And to adjust the height of the rollers, you have to insert the screwdriver into the hole.
Method 2: Adjusting Andersen Replacement Rollers on Andersen Sliding Glass Door
Sometimes, you might plan to adjust direct Andersen replacement rollers on your sliding glass. If your plan is this, you will require no screws! First of all, you have to take a look at the bottom of the door. All you need now is to insert rollers into the mortise.
Check for the mortise in the bottom part of the door. Once you find it, start inserting the roller into that mortise. However, you have to be extra cautious about the line-up of the rollers here. While doing it, certify that you are lining up the center screw on the rollers with the adjustment hole.
After you have installed the rollers and it is halfway installed, you have to get your hands on a wooden block. With the help of the wooden block, all you need is to knock the rollers. This will help you to install the rollers by taking them into the mortise.
If you don’t put a bit of pressure, the rollers won’t go in. If you see that the sliding glass door adjustments screw not working for the Andersen doors, you can simply get your hands on the replacement screws!
Note: You surely have thought about using a hammer in the place of the wooden block we have suggested, right? Well, we highly recommend you to not use a hammer. A hammer is very heavy and can damage both the roller and the mortise. If you want to installation to be damage-free, the best thing is to settle for the wooden block we have recommended for your Andersen sliding glass door.
Method 3: Adjusting Non-Andersen Rollers on Andersen Sliding Glass Door
Keeping the sliding door on track is the best prevention! Check out the best sliding door track to release future hard work. But if the rollers are working, plan to change them. Well, you will not always install Andersen replacement rollers for the Andersen sliding glass door, right?
If you think about the expense or you don’t find any replacement available, you can settle for the non-Andersen rollers too! But can you install non-Andersen rollers on Andersen sliding glass doors? Yes, you can! But for installing and adjusting them, you might need to follow some basic cautions.
For the job, you will require screws. Here, two screws will be needed. Along with the screws, you will need a drill. As the non-Andersen rollers are not designed for the Andersen sliding doors, you might need to drill it to make it the right fit.
For installing and adjusting it, you have to go for the rollers first. Get your hands on the right rollers and then insert them into the mortise. While inserting, you have to be careful about the center screw. Make sure it is properly lined up with the adjustment hole that is already there.
Take a look at the rollers and ensure that it is properly aligned. Once you have ensured the alignment, you need to secure the rollers. For securing it, get the screws and place them on the bottom of your door.
After you have got the rollers in, it’s time to make them stable. Firstly, get your hands on a large head screwdriver. You will need a flat head one for the job. Take the screwdriver and get it into the adjustment hole.
Once you get it in, you have to run it to retract the rollers. Go for a counter-clockwise direction here. When you are done with one set of rollers, go for another one. You must verify that both sets of rollers are secured with care.
Also, take a look to ensure that they both are at the same height or not. In case you are tired of the vertical blinds, get your hands on the best blinds for sliding doors or sliding panels. These can save you and give you a sleek style too!
Tips to Adjust Andersen Sliding Glass Door Rollers
Read out the tips before you try to adjust the rollers of your Andersen sliding glass door.
- Over-tightening the screws of the Andersen sliding glass door will make it lose and eventually, it will not be secured properly. Keep the door on track and make sure that between the frame and the door panel, you have closed within a ¼ inch gap. From the top to the bottom, the distance should be the same too.
- When it comes to re-inserting the screwdriver into the adjustment holes of your door, you have to go for a clockwise motion so that you can raise the door a bit. Until the door doesn’t wobble in the frame, you have to keep trying to follow this. After a while, when it gets the track, it will glide smoothly on the track. You must adjust both sides uniformly.
- You can always install the rollers alone. But as Andersen glass doors are made of glass, there’s a chance of damaging the door and harming your body too. You can damage the rollers and the other gears. And so, we recommend you settle for a partner. Your partner will be able to hold the door in place when it comes to adjusting the rollers and wobbling the door into the frame.
Wrap Up
So, you have checked out how you can fix the rollers on the Andersen sliding glass doors. Now, all you need is a partner and start working for it. It takes time but saves a lot of money!