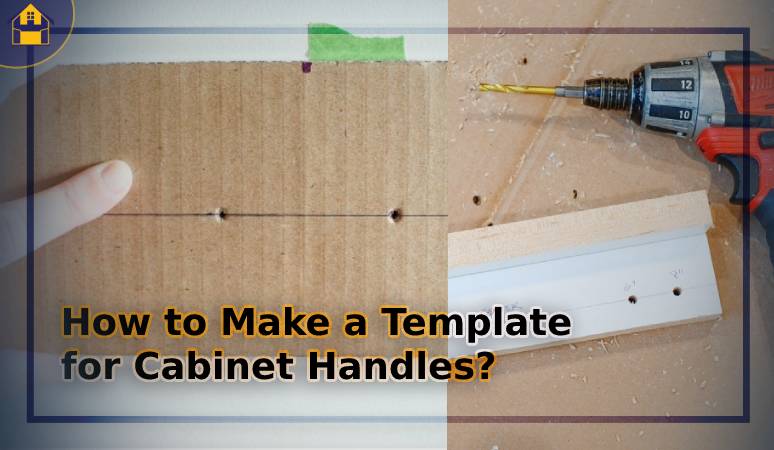
How to Make a Template for Cabinet Handles [DIY]
Templates for cabinet handles are quite inexpensive, so, you can always get them and save your time! But well, if you are a DIY lover or you want to make custom templates for cabinet handles- why not make this weekend productive?
These fixed patterns will hello you mount the hardware to your cabinet and if you make your own- the measurements will be more precise, no doubt.
Let’s talk about how to make a template for cabinet handles at home with simple cardboard, poster board, or foamboard!
Steps to DIY Templates for Cabinet Handles
When it comes to cabinet hardware templates for large handles, you get into a dilemma about which one to buy. How about making a custom one? In this journey, we will tell you how to construct the template for the hardware with the gears that you already have!
Step 1: Gather the Equipment
The first job when it comes to installing cabinets is gathering the gears that you need for the job. The job isn’t tough but if you are not comfortable, we always recommend you to buy a cabinet handle template online for hardware stores.
Now, the first thing you will need is the basic material for the job. The easy option to go for is cardboard. However, some people prefer a foam board for the construction of a template. In this case, you can also settle for posterboard.
All of them will do the same job. Besides the basic material, you will need a drill to make holes. And for the measurement, you will require a ruler and pencil. Make sure you don’t forget to utility knife or scissors.
And finally, get your hands on markers. But in this case, we highly suggest you go for washable markers as these will not stain your material. As a result, the final finish will be just like the professionals!
Step 2: The Right Measurements
Now that all the gears for the job are ready, you can start your work. To deal with how to make a template for kitchen cabinet handles the right measurement the priority. If the measurements are wrong, the whole effort will go in vain.
So, makes sure you read this step cautiously. Check your cabinet first and then decide where you want the template to go on. Regardless of the place you are choosing, you will require two different measurements for the job. Here we will discuss the two and help you measure them properly.
· Width of the Side Panel
If you are working with the drawer, you must check out how to get drawers out of kitchen cabinets. It will help you if you are comfortable with measuring it after taking it out. When it comes to the measurement, the side panel is what you have to go at first.
Check the side panel of your cabinet. With a tape measure, you will need to measure the width of this one. Don’t forget to note down this measurement otherwise, you will forget it.
Record it as P. The width you measure here will be equal to the width of the template you are making. So, the first measurement is done. Let’s move to the next one.
· The Distance
Now that we are here to go for the second measurement, you have to decide where you want to add the template or hardware. Once you decide, you have to select where the first drill hole will be and name it D1.
After this, get your hands on the bottom part of the cabinet. Hold the tape measure here and go right up to D1. Once you find it, record the measurement as D.
You have measured P and D already, it’s time to move to the third step.
Step 3: Cut the Template
In the third step, you have to get a hold of the pencil and ruler for the proper measurement. Go to the side corner of the cardboard you are using. If you are using a foam board or poster board, go for that one.
In short, you have to move to the side corner of your base material for the template and there, you have to mark the first measurement P. You might be curious why we are using the corner of the board here.
Well, if you go for the corner, when it comes to settling for the 90-degree angle, it’s easier and more precise. So, what about the height of the template? Well, the height is connected to the size of the hardware you are using.
If you have got different sizes of cabinet pills, you can always decide to DIY an extra tall template! At the final stage of this step, your job is to cut out the template. This is where the utility knife will work. If you don’t see any utility knife here, you can pick up a scissor to do this job.
Step 4: Find the Center
You are done cutting the template already! Get your hands on the ruler once again. Now, your job is to find out the center point of the template that you have cut. Hold the ruler and measure it. Then divide the length by two.
And then, you can easily get the center point C. Use the pencil for drawing a line at the center point. You have to draw this line in a way that devices the DIY template in two halves. Once you have drawn this line, you can move to the next step.
Step 5: Mark the Intersection
In the fifth step, you, once again, have to go back to the second measurement that we have found in step 2. Yes, we are talking about the distance D here. In this position, you have to check the record and take D.
Then, you need to measure from the button up on your DIY template. Here, it’s necessary to mark the intersection. Here, the lowest hole is a factor too.
On the hardware, check for the lowest hole and right there, you have to mark the intersection. Use the pencil once again to mark this point.
Step 6: Work on the Distance
To complete the construction of the template for your cabinet handle, you need to go through the distance between the hardware holes. This is a very easy trick that most professionals follow. In this way, you can easily complete the rest of your job.
For this, get your hands on the marker. Once again, we recommend you settle for a washable marker because you have to take it off after you are done with constructing the template.
With the washable marker, you have to check the bottom part of the hardware and there, all you need is to color the screw holes. It’s time to line up the hardware on the DIY template. And then, you have to stamp the color onto your template.
At times, you might plan on using more than one size of hardware. In this case, the color of the template will be confusing if it is the same for all the hardware sizes.
So, the best thing you can do here is to go for more than one washable marker. When the color will be different for every hardware size, it will be easier for you to understand.
Note: After this, your template will have the hardware sizes on it. For taking off the marker, all you need is a wet sponge. Dab the area with the wet sponge and there will be no color at all!
Step 7: Line up the Hardware Template
We are almost at the end of the template-making process. Here, you have to get a hold of the cabinet’s edge. Check the edge of the cabinet and line up the cabinet hardware template there.
Make sure you have firm hands because you need to hold them steadily in that position. If you need both of your hands to do the other jobs, you can simply settle for a bit.
A bit of painter’s tape will help you secure the position of the cabinet hardware template on the cabinet’s edge for a while.
Step 8: Attach the Hardware
Your hardware is ready- your job now is to add it. For attaching the hardware to the cabinet, you will need the drill. Check the appropriate holes that we have measured before.
You have to go for the holes to add the hardware here. First of all, check the marks and then start drilling. Find out the right drill bit for cabinets hardware here! And then, hold the drill level before you start the process.
Once you have drilled through the right holes on your cabinet hardware template, it will be easier for you to add the hardware! There you go- you are done, bravo!
Wrap Up
You don’t always need to buy things when you can make it at home! The same goes for the template for cabinet handles. Yes, they are available in the market but making DIY templates for cabinet handles can help you productively spend your weekend. Try the above-mentioned steps and you will be amazed by the results!