How to Cut Door Hinges with a Dremel? (Answered)
Having a Dremel will solve almost half of your DIY woodworking life! From grinding to sanding, cutting to carving, there’s nowhere it will disappoint you.
If you cut the door for adding door hinges and installing it, hiring a professional will cost you more than $50-$60. But when you can do it on your own, why do you need it? We will show you how to cut door hinges with a Dremel with half the cost.
Here is How to Cut Door Hinges with a Dremel:
Go through all eight steps and you will be ready to cut the door hinges with the help of a Dremel and save your money!
Step 1: The Measurement and Marking
Well, when you are ready to cut door hinges, marking is the first vital thing. You cannot cut it unless you have marked it properly. So, first of all, you have to mark the door precisely. Get a hold of the door and place it against the doorway. In this way, you can line up the right place of the hinges to go.
Method 1: First of all, you have to look at the door and select the spot where the hinges will look the best. It should be comfortable to hold, pull and see! Once you have selected the right place, all you need is to mark that specific spot. For every hinge, you have to out one mark. With this mark, you can cut with more clarity.
Method 2: On the other hand, you can also set the door down on its side first. And then, get a hold of the measuring tape. Then go to the top and measure 6 inches down from that position of the door. Ensure that the tape is straight.
To make the mark, draw a line with a pencil along with the tape. This will be your backup measurement. From the bottom, you have to settle for 9 inches up from this part. Once again mark it with the tap and then use a pencil for more visible marking.
Step 2: Use a Utility Line
The measurement and the marking of the hinges are done. Now you know exactly where you want to place the hinges. Here you have to locate the hinges themselves. Get the door on a flat surface and then get your hands on the first hinge.
Check the tape marking and line it up with the marks. It’s time to place the hinge. Make sure it is straight folded along the door’s edge. Remember how it should be when it’s installed. Whenever it comes to opening it, the hinge will work as an axis. Position the hinge on a uniform surface on the door. Now, it’s time to locate the outline.
You have to settle for both sides in this case. For the job, trust a utility knife. Take the utility knife as close to the hinge as you can when it comes to cutting with it. This will help you get the right location for cutting it later.
Step 3: Repeat Tracing
So, once your tracing is done, you will like to move to the new step. But we recommend you to settle for the same process and repeat it 2 more times. From the top hinge, repeat the same process. In this way, the tracing will be more noticeable.
It’s time to place the bottom hinge now. Follow the same way to trace it using the knife. Just like the first method, you have to make it noticeable. For this, you need to go for two to three passes.
All you need is to see the marking, isn’t it? In the case of the mortise hinges, you might need a chisel for the job. Or else, you can take a look at how to mortise hinges with a router too!
Step 4: Changing the Bit
Before you get your hands on cutting the door hinge, you should plan to change the router bit on the Dremel so that it can do the job properly. If you have cut door hinges before, you already know. For the newbies, let us tell you that the ones you use for the cabinets are not the same for the doors.
Check out the router bit for the cabinet here if you want! And for cutting the door hinge, you have to get a 650 router but. However, if you don’t have it, you can simply pick up any straight bit. It will do the job for you! All you need is to open the spindle carefully and add the router bit’s head. Insert it and you are ready.
Step 5: Adjusting the Dremel
Often people ask- can you use a Dremel to cut out door hinges? Of course, you can! From cutting to carving to grinding, it almost does all the work! After inserting the spindle, you have to tighten it properly.
Otherwise, there is a chance of an accident. Once it is properly attached and is in the right place, you have to measure the door hinge. Yes, once again, you have to measure it so that the cutting depth is not wrong.
You are done changing the bit; it’s time for adjusting the Dremel. From cutting depth to the cutting height on the Dremel, you have to ensure that all the measurement matches the ones of the doors.
Step 6: Ensuring the Safety
Not to mention, you have to wear safety gear now. From the safety glasses to the gloves you need to keep your body safe is needed now. You have to take all the safety protocols that are required for such a woodworking job.
Step 7: Position the Dremel
Once you are done with wearing the safety gear. Take the router bit of Dremel and line it up with the tracing. Do you remember the tracing that you have done with the utility knife? All you need now is to line it up with that specific tracing.
To verify that the line is perfect and even, call one of your friends or family member about it. Don’t forget a dustpan. This will help to keep the air around you away from dust and dirt. Check out the best cabinet hinges and door hinges to pick up the right one beforehand.
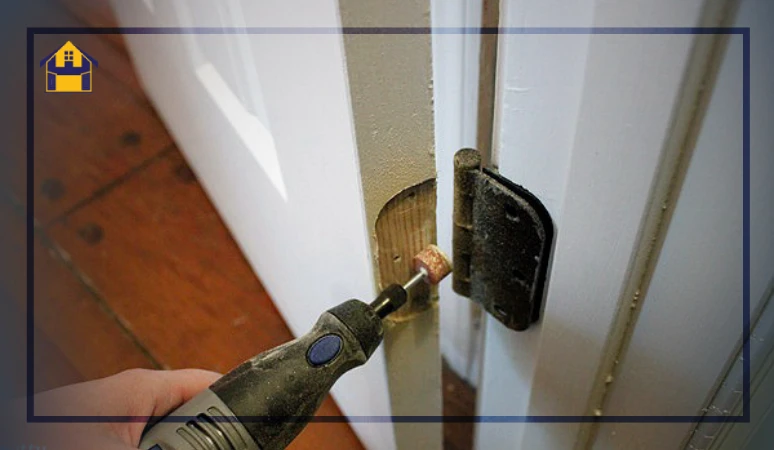
Step 8: Cutting the Hinges
Finally, we are here to cut the hinges! Keeping the router bit in its position, you have to turn on the Dremel. And then, press it down on the traced measurement. Be slow but firm with your hands. You have to hover over every edge that is traced.
Make sure that the pressure on the Dremel is light. After you have removed all of the wood, you are ready. It’s cut already, it’s time to install the door hinges according to the manual you are given. Install it and enjoy putting your DIY experience to work.
Wrap Up
No, you genuinely don’t need to pay a whole lot of money to a professional to cut the door hinges for you. You can simply do it with a Dremel! Measure and mark the placement and then get the right router bit to cut it! Let us know in the comment box how the method worked for you, my friend!