How to Hang Floating Shelves on Drywall?
Hanging floating shelves on the masonry or the solid brick wall makes it easy for you because all you need is to drill and set. But with the drywall, you need to go for a floating shelf bracket along with anchor plugs. If you have drywall and you still want to mount a floating shelf, let’s tell you how to hang floating shelves on drywall!

Step by Step Mounting Drywall Floating Shelves
Some shelves in the market are specially designed for drywalls. If you have recently added sliding drawers in the kitchen, you might want to add some floating shelves around you too! Have a look at the process to install sliding drawers in kitchen cabinets and then, check out how to mount the floating shelf!
Step 1: Understanding the Wall
Your first job is checking out which wall you have. The floating shelf hanging method depends on the wall of your house. Here, you already know that it’s drywall. However, if you have no idea about the wall, first, you have to check what it is and then plan on installing the floating shelf on the wall.
The fixing depends on the wall. Just as you use wall plugs for the solid brick or masonry wall, you won’t be able to do that for the drywall. In the case of drywall or plasterboard, you have to settle for worm-style fixing. For these, the drywall anchor plugs are the best deal.
Step 2: The Safe Passage
So, here you are ready with your drill bit to drill the wall. But hey, wait! What if the wall has obstacles? It will not only stop your holes to be smooth but will also ruin the wall and the obstacles. The walls of your house include electric cables.
Also, water pipe runs within the walls. So, drilling anywhere in the wall might result in severe problems. But how can you know what’s underneath the wall? Well, this is why we recommend you get a digital detector.
These are professional devices to tell you if there are any electric cables or water pipes on the spot. Check it and then decide which place is safe for drilling or adding anchor plugs.
Step 3: Marking the Space
Here, you are ready with your drywall space that’s completely safe from any obstacles. Now, you have to get your hands on the fixings! For understanding the right angle and position of the holes, get a hold of the shelf bracket first.
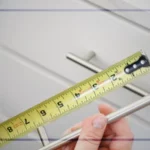
Take it to the wall and position it where you want to mount it. Make sure that the height you have selected is perfect. Also, keeping the shelf straight is necessary. If you do not hold the shelf straight now, it will eventually not get mounted straight because the fixings won’t get installed perfectly.
Once you have placed the shelf in the right position, you have to work on marking the positions. The holes you need to drill or where you have to add anchor plugs have proper alignment with the shelf. With a pencil, mark the holes.
Whenever it comes to the right alignment of the shelf, we suggest you get a spirit level for perfection. After getting the pencil marks, you have to once again check if the alignment is right or not with the spirit level.
Step 4: Making Small Dent
Once you are done with the pencil mark, it’s time to make it more visible. To do it, before you drill the holes, you have to make a small dent in the center of the marks that you have created with the pencil. For this, settle for counterpunch and a hammer.
A lot of people ask why we make a small dent. Well, if you simply take your drill bit on the pencil mark and try to drill holes, chances are, and your drill will slip. However, things are easier with the drywall. But, also, the screwdriver might slip in some cases. To stop this slipping, a small dent helps you a good deal.
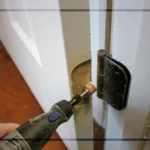
Step 5: Attaching the Brackets
So, you are done with the preparation for the drilling. It’s time to attach the drywall fixing. Keep in mind that other fixing might be different from this one. Because you cannot add the shelf on the drywall just like other walls.
Adding wall plugs for installing the shelf will require drilling. However, as we are dealing with the drywall here, you have to go for anchor plugs. These are the worm-style fixings that keep the wall in perfect condition even after adding the floating devices.
After this, cover the marks so that you can stop the plaster from cracking. Go for Sellotape for the job. And then, you are free to screw the fixings! Once you are done attaching the wall fixing, you can move to the next step.
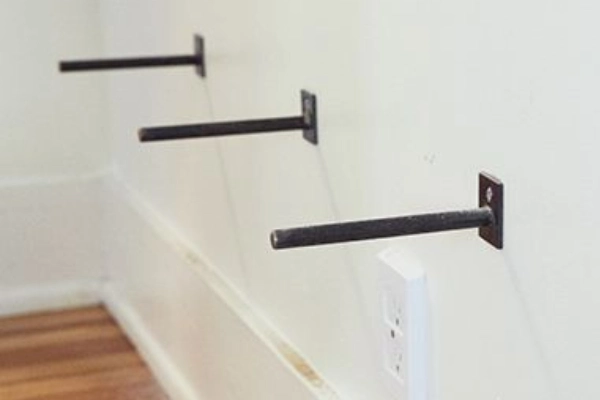
Step 6: Adding the Floating Shelf Brackets
After the anchor plugs are fixed and stable, you are ready to go through the bracket to the wall and make it work. The holes are drilled now. It’s time you can screw on the wall shelf bracket. Hold it and take it to the right position.
You can settle for the drill along with the screwdriver too. Go for anyone and then insert the screws in their right places. And all you need to ensure is that the bracket is perfectly tight and snug,
Step 7: Set the Shelf
You are almost done with the mounting process. As the bracket is ready, all you need to do is slowly slide the floating shelf onto the bracket. The base will be fixed after a while and then, you are free to get the shelf into the bracket without any complications.
Step 8: Secure the Shelf
So, the shelf is already set on the bracket and you should be ready for securing it to the bracket too. Check the underside of your floating shelf. Some fixings will keep the shelf secured. These are designed so that the floating shelf does not slide off the shelf bracket during work.
You will see some holes. All you need is to get some screws that fit and fill up the holes. In this case, you have to screw upwards to keep the balance. Check it is moving or is unstable or not. If not, you are done!
Product Recommendation
I believe you already have your floating shelve to hang on the wall. But if you are still searching for the perfect ones, you might check out some aesthetic shelves like Hexagon Floating Shelves, BAYKA Floating Shelves for Bedroom Decor.
Wrap Up
Hanging a floating shelf seems easy but it takes a bit of effort when you do it alone. So, all we recommend is to find a friend or a family member that can help you, hold the shelf for you, and keep it straight when you install it. A shelf leaning on either side of it doesn’t look good, you know that!