How to Measure and Install Drawer Pulls? (Step-by-Step)
After you have installed the ball bearing or roller bearing drawer, you have to install the drawer pulls too! Picking up the single-hole ones and the double-hole ones is completely your choice! While installing single-hole knobs is easier than two-hole knobs. But no worries, we will go how to measure and install drawer pulls for both of them, stay tuned!
Installing Drawer Pulls: Single-Hole and Double Holes
We have managed to get our hands on both methods of installing drawer pulls. And our research shows you the measurements you need for both of them!
How to Install Single Drawer Pulls
First of all, we will describe how to put new handles on drawers with a single hole and then, we will discuss the double holes.
Step 1: Things you need
To learn how to measure for kitchen cabinet handles and complete the installation, here is a list of gears that you need. Have a look at them and gather them beforehand.
- Drill and Bit
- Screwdriver
- Tape Measure
- Paper and Pencil
- Dish Soap
- Piece of Cloth
And don’t forget to go through the best cabinet pulls here to ensure the pulls last longer than your kitchen does!
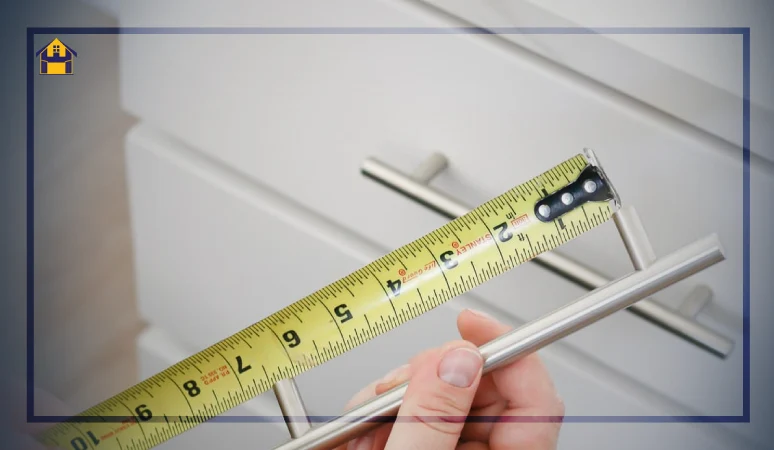
Step 2: Measure the Height and Width
After you have gathered all the gears you need for the installation, you have to move for the installation process. However, you cannot install the drawer pulls or the handles if you do not take the right measurement.
So, here, the first job is to measure the drawer. For measuring it, you have to settle for both the horizontal and vertical measurements.
Go for the drawer face and hold the measuring tape. Measure the vertical height first. Note it down. And then, you have to measure the horizontal height of the drawer face. Note it down once again.
Step 3: Determine the Center
Now that you have measured the height and width both, it’s time to find out the center point of the drawer face. The center is required here because we are dealing with the single-hole drawer pull which is most often called a drawer knob.
So, to determine the center of the drawer face, you have to check the noted two measurements and divide them by 2. In this way, you can get the center of both of the measurements. With the help of the tape measure, find out the center of the drawer face first. This can get a bit confusing. So, we will be e bit mathematical here.
There are two vertical sides of the drawer face.
- The Upper One: A
- The Lower one is B
Find out the centers of A and B.
- The Center of A: A1
- The Center of B: B1
Go through the two horizontal sides of the drawer faces again.
- The Right One: C
- The Left One: D
Now, once again, find out the centers of C and D.
- The Center of C: C1
- The Center of D: D1
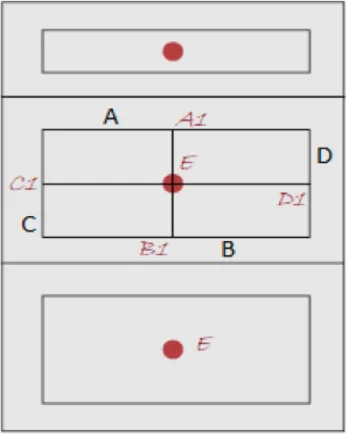
Once you have found out A1, B1, C1, and D1, you have to get a pencil and draw a line from A1 to B1 and then C1 to D1. Eventually, you will find a plus or cross which will meet at a common point. Let’s call it E, the center.
Step 4: Drill a Hole
So, the measurement for the single-hole drawer pull is done. You have found out the center E. It’s time for drilling the hole you need. For this, get your hands on a drill and add the required drill bit with it.
Once you are ready with the machine, all you need to do is get the device on the center E and drill it. While choosing the drill but, you have to be careful about the thickness. The drill bit should be equal to the screw or bolt of the knob you are adding to the drawer face.
Step 5: Setting the Bolt
After you have drilled the hole according to the size of bolt you are going to add, it’s time to get the bolt inside. Push it through the drawer’s one side to another.
The bolt should come out from the inside of the drawer face to the outside. With your finger, hold the bolt from the outside of the drawer face so that it doesn’t fall.
Step 6: Tighten and Secure
It’s time to turn the pull. Go for a clockwise motion. This will help you tighten it onto the bolt. After a while, the knob will stop turning and it will get strong.
Here, you have to keep the bolt stable and then get your hands on a screwdriver. With the help of the screwdriver, all you need is to tighten it. Keep using the screwdriver so that the knob is secured in place. Make it snug, however, do not overtighten.
If you haven’t yet installed the drawer slides, check out how to install roller drawer slides before you install the knob!
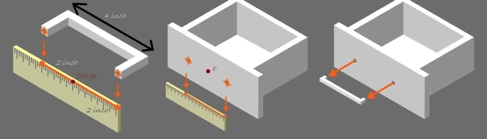
How to Install Double Drawer Pulls
For the double drawer pulls with two holes, here’s the way to install it! It’s not that tough; trust us!
Step 1: Determine the Center
Check step 1 from the first method of installing the drawer pulls for a single hole. The gears you required are the same. Prepare them before you start the method. Get a hold of a tape measure and with it, just like before, you have to find out the horizontal width and vertical width of the drawer face.
Then, take a look at the measurement we have done before. You have to find out the A1 and B1 along with C1 and D1. These are the centers of the lines. You have to draw a faint cross accord the face of your drawer. These will help you determine the center point,
Step 2: The Right Measurement
Now, it’s your time to go for the distance between the mounting holes of the handles. But how to measure drawer pulls center to center and identify the center of the handle? With the tape measure, you can find it out.
Measure the full distance from one hole to another and divide it by 2. You have to mark this distance horizontally to the left part and the right part of the center point. If the distance between these holes is 4 inches, from the center, you have to go 2 inches to the left and 2 inches to the right through the horizontal line.
The standard drawer pull hole spacing is about 3 to 5 inches. So, the center in this case will be near 1.5 inches to 2.5 inches. Once you get these points, you have to mark these locations with the help of a market. This will help you learn about the mounting locations of the handle will you will drill the holes.
Step 3: Drill Two Holes
It’s time to drill the holes you need. Unlike the first method, here, you have to go for two different holes. According to the marked locations, you have to drill two holes. Go for the right drill bit that matches the bolt you are adding.
These holes will help you for the drawer pulls only; you can deal with the cabinet doors with this method. For that, go and check out how to measure for full overlay cabinet doors, the process is described in detail.
Step 4: Tighten the Bolts
It’s time that you add the handle. For adding it, just the way you did before, you have to get the bolts from the inside of the drawer face and then push it outside. After pushing it, it won’t stay there if you don’t hold it from the outside.
With your fingers, from the outer part of the drawer face (from your side), you have to hold the screw. Get the handle mounts there and place them against the bolts. While adding the handle, you have to screw one bolt at a time.
You can plan to add one screw and slightly tighten it and then move to the next one. And finally, after both of them are loosely placed, you have to tighten the screws into a snug fit. Go for a screwdriver for the job. And you are done!
Wrap Up
No matter you are dealing with a single-hole drawer pull or the dual one, the first thing you need to ensure is the right measurement. If the measurement is wrong, the drawing pull will not be installed at the center and it will look bothersome. Read out the measurement sector carefully to make it look the best after you are done with the installation!