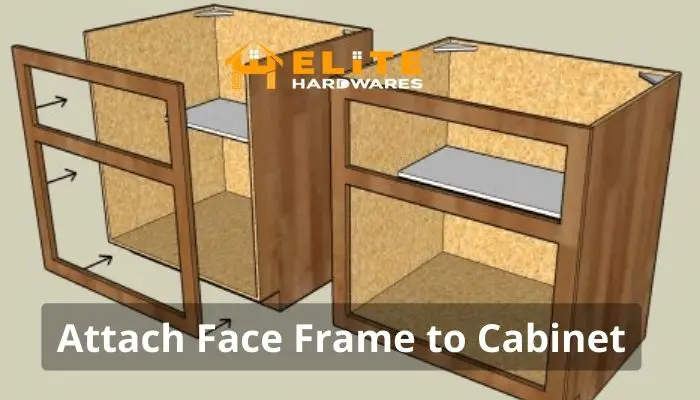
How to Attach Face Frame to Cabinet in Five Simple Steps
Face frames in cabinets are a wooden external structure adjacent to the cabinet body. So if you want to know how to attach face frame to the cabinet, you should follow the following techniques.
You can try different techniques to attach a face frame to a cabinet, such as the pocket screw, biscuit, or glue. The pocket Screw Technique is a long-lasting technique to keep the face frame attached to the cabinet. Just create pocket holes and drill in screws.
With the help of pocket screws, you can attach a face frame to cabinets in minutes. Keep reading if you want to figure out how.
What is a Face Frame?
A cabinet face frame is an outer layer attached to a cabinet as support for exterior cabinet hardware. It also works as a shield to protect the cabinet edges and hides the hinges.
However, frames restrict the space inside a cabinet and limit the free movement of heavier objects into the cabinet. Having a face frame in cabinets is optional and used mostly for beautification purposes.
Let’s take a look at the instruments you will require for this and then dive into the detailed process.
Instruments
- Pocket hole jig
- Pocket hole screws
- Wood adhesive
- Clamps
How do you join a face frame in Five Simple Steps?
Once you have all the instruments ready, you have to follow the simple processes explained below
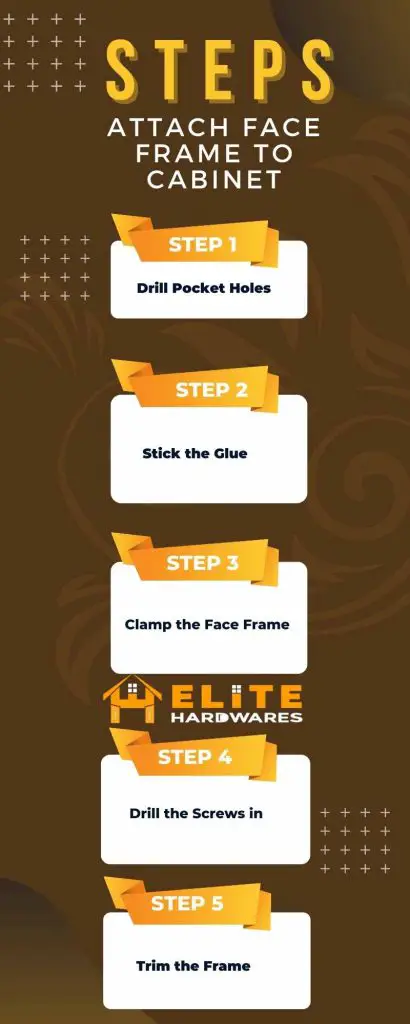
Drill Pocket Holes
With the help of a pocket hole jig, drill out holes in the carcass. The holes will come out in the shape of pockets. These holes work as super strong joints for holding the whole piece together.
Pocket holes are different in shape than straight holes. That’s why it’s best to use a pocket hole jig to drill them. You can also do it without a jig. But that requires a different and time-consuming process.
Stick the Glue
Carefully put glue in the carcass and the face frame. Then place the face frame on the cabinet carcass. This will help them stick together. However, for a joint that lasts for a longer period, you should follow the next steps.
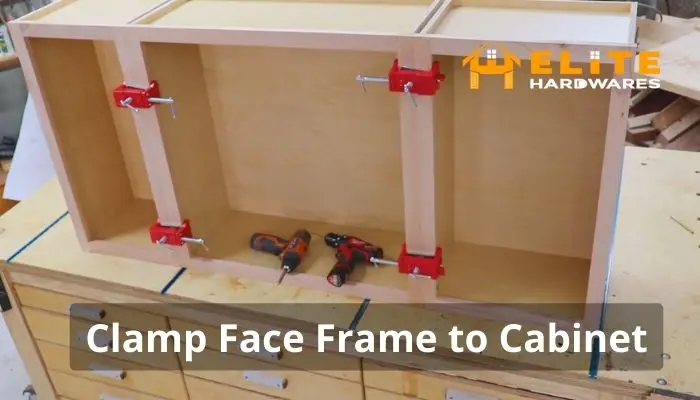
Clamp the Face Frame
Now it’s time to position the face frame. Place it over the cabinet carcass. It is better if there is a little bit of overhanging from the sides. The sides of the frame can be smoothed out later using a trimmer.
Now use clamps to hold the face frame firm in its place. You will require multiple clamps for this purpose. After you have clamped the frame to the cabinet, proceed with the next steps.
Drill the Screws in
With the frame clammed, you gain better control as the frame won’t move around while drilling. Drill the pocket screws in the pocket holes to attach the frame to the cabinet body.
Pocket screw holes create a stronger bond that can last up to many years. You won’t have to go through the trouble of fixing cabinet frames frequently.
Trim the Frame
All there’s left to do now is to trim the sides to flush the frame with the cabinet. So take a wood trimmer and trim the sides till they are level with the carcass and then you are all done!
If you want an easy demonstration of the process, you may want to watch this helpful video:
You can also read an insightful blog on how to fix a broken cabinet frame.
Frequently Asked Questions
What size screws to use in pocket holes?
For attaching face frames that are ½” thick, the length of the screw would be 1”. For ⅝” thickness, pocket hole screws should be 1”. And for ¾”, it should be 1¼”.
Is drilling pocket holes without a jig possible?
Yes, it is absolutely possible to drill pocket holes without any jig. In that case, the hole needs to be made angled cautiously followed by a wider hole.
Final Words
The use of a face frame in cabinets is an American style of cabinet designing, which would work as external support for attaching designed handles and hardwares when you’re done with how to attach face frame to cabinet.