How to Install Surface Mount Hinges? | 7 Easy Steps
Cabinet doors that are flat or angled may employ surface mount hinges. Surface mount hinges have traditionally been a popular alternative and are presently quickly regaining favor even though they are not very attractive.
So, how to install surface mount hinges?
Surface mount hinges only need to be screwed into the project’s surface; you don’t need to cut into the surface to connect them. To install doors, cabinets, and other items that need a hinge, surface mount hinges may be used. They can be installed quickly and easily!
Let’s describe the entire process step by step below in the post.

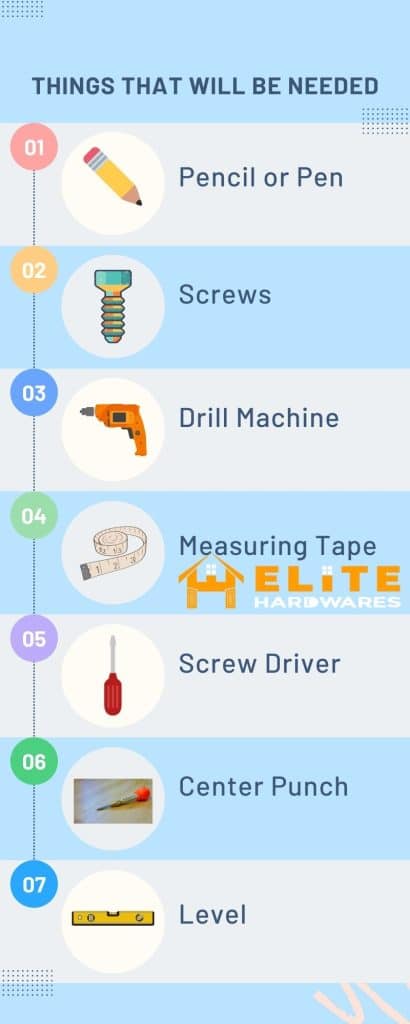
Things That Will Be Needed
- Pencil or pen
- Screws
- Drill Machine
- Measuring Tape
- Screw Driver
- Center punch
- Level (optional)
How to Install Surface Mount Hinges?: Step by Step Process
Take Apart the Hinge
Attempt to disassemble the hinge. Some hinges are made of a single component and cannot be disassembled. However, if your hinge can be taken apart into individual components, remove the hinge pin. This will make installing it simpler for you.
Measure everything accordingly
To place your hinges evenly, use a measuring tape and level. Measure it to ensure that the hinges are spaced equally from both ends of your cabinet or door.
Place the Hinge in Its Spot and Mark the Points
To make sure the hinge is level, use a level or combination square. Use a pencil or a piece of painter’s tape to mark the location of the hinge. If you have disassembled the hinge, don’t forget to indicate the locations for both pieces, not just one.
- Typically, a door hinge is set 5 inches (13 cm) from the top and 10 inches (25 cm) from the bottom of the door.
- Set the level at the top of the hinge to utilize it. Move the hinge such that the level’s bubble is situated between the middle two vertical lines.
- Use a combination square by aligning the square’s edge with the edge of the door, cabinet, etc. You can align your hinge by creating a right angle with the combo square.
Mark the Center of the Hole
After positioning the hinge, mark it with a pencil. Once you’ve chosen the location for the two hinge components, use a pencil to draw a circle around the hinge and screw holes. Once you’ve traced the hinge, take the entire thing off.
To help you determine where to put the screws, mark the middle of the hole. Use a center punch to indicate the center of each hole you just traced. If you don’t have a center punch, you can make a little hole right where you want the screws to go by using a nail and a hammer.
- To indicate the center of the hole, use a pencil or pen to place the center punch’s tip there. The indentation is made by striking the center punch’s top with a hammer.
Drill the Screw Holes
Make the screw holes by drilling them. The center punch’s indentations, which you should place your drill bit into, will help prevent your drill from shifting. Drill each and every screw’s hole with care.
- Use a drill bit that is just a touch smaller than the size of your screws.
- You can find online charts indicating the appropriate size drill bit for your screw size.
- Hold the drill bit up in front of the screw to perform a visual inspection. The drill bit is too large and you need to move down one or two sizes if you can’t see the screw’s threads.
Screw the Holes
After positioning the hinges, screw one into each hole. Place a screw in each hole of the hinges after aligning them so that they are in the center of their tracings. Tighten the hinges by turning the screw.
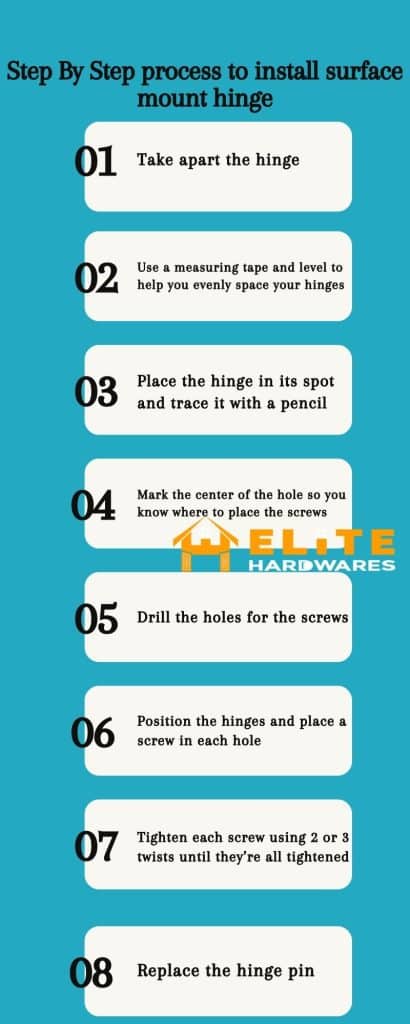
Tighten Each Screw
Until all the screws are tight, twist each one two or three times. Start tightening each screw one at a time with a screwdriver. Before moving on to the next screw, tighten the first one for up to three rotations. Continue doing this until they are all equally tight.
You may also like: How to Install Strap Hinges on a Chest? Easy Way
Replace the Hinge Pin
If needed, change the hinge pin. Once the screws are nice and snug, you can replace your hinge if it comes in two sections with a hinge pin. Simply tuck it between the two hinge pieces.
- Install the top hinge first to aid in alignment while installing a door or cabinet.
Additional read: How to drill out a storage cylinder lock.
Frequently Asked Questions (FAQ)
How do you install surface mount hinges on a box?
To attach the hinges to the box, drill the hinge holes. The lid should now be positioned closed on top of the box after applying a strip of double-faced tape to the top of the hinge. Press hard over the hinge to ensure a strong binding between the lid and the tape.
What is a surface mount hinge?
Surface mount hinges are fastened to the door’s exterior and frame without a mortise.
Bottom Line
Instead of requiring you to recess the surface to connect them, surface mount hinges just screw into the project’s surface.
Surface mount hinges can be used to mount doors, cabinets, and other objects that require a hinge, which comes in handy in any given situation. So, learning how to install surface mount hinges is never a bad idea.